
Science and fun


age level :
kids upto 10


You need:
* 1/4 cup of water
* 1/4 cup of white craft glue (like Elmer's glue)
* 1/4 cup of liquid starch (used for clothes)
* Food coloring (optional)
* Mixing bowl
* Mixing spoon
Method:
-
pour all the glue into the bowl.
-
Pour all of the water to the mixing bowl with the glue.
-
Stir the glue and water together.
-
Add your food color now - about 6 drops should do it.
-
Now add the liquid starch and stir it in.
It should be nice and blobby by now. As you play with your slimy concoction, it will become more stretchy and easier to hold.
Explore your slimy creation and store it in a zip bag when you are not using it.

* An empty soda can
* blown-up balloon
* A head of hair
1. Place the can on its side on a flat smooth surface like a table or a smooth floor.
2. Rub the blown up balloon back and forth through your hair really fast.
3. Now the fun part - Hold the balloon close to the can without actually touching the can. The can will start to roll towards the balloon without you even touching it!
Try This Too: While you've got the balloon out, tear up part of a tissue into tiny pieces about 1/4 inch (.5 cm) big. Rub the balloon in your hair again and bring it close to the tissue pieces. They will be attracted to the balloon and then jump away.
This works a lot like our bending water experiment. When you rub the balloon through your hair, invisible electrons (with a negative charge) build up on the surface of the balloon. This is called static electricity, which means "non-moving electricity" The electrons have the power to pull very light objects (with a positive charge) toward them - like the soda can.

-
clean dry paper clips
-
tissue paper
-
a bowl of water
-
pencil with eraser
-
Fill the bowl with water
-
Try to make the paper clip float...not much luck, huh?
-
Tear a piece of tissue paper about half the size of a dollar bill
-
GENTLY drop the tissue flat onto the surface of the water
-
GENTLY place a dry paper clip flat onto the tissue (try not to touch the water or the tissue)
-
Use the eraser end of the pencil to carefully poke the tissue (not the paper clip) until the tissue sinks. With some luck, the tissue will sink and leave the paper clip floating!
How is this possible? With a little thing we scientists call SURFACE TENSION. Basically it means that there is a sort of skin on the surface of water where the water molecules hold on tight together. If the conditions are right, they can hold tight enough to support your paper clip. The paperclip is not truly floating, it is being held up by the surface tension. Many insects, such as water striders, use this "skin" to walk across the surface of a stream.

-
A clean 1 liter clear soda bottle
-
3/4 cup of water
-
Vegetable Oil
-
Fizzing tablets (such as Alka Seltzer)
-
Food coloring
1. Pour the water into the bottle.
2. Use a measuring cup or funnel to slowly pour the vegetable oil into the bottle until it's almost full. You may have to wait a few minutes for the oil and water separate.
3. Add 10 drops of food coloring to the bottle (we like red, but any color will look great.) The drops will pass through the oil and then mix with the water below.
4. Break a seltzer tablet in half and drop the half tablet into the bottle. Watch it sink to the bottom and let the blobby greatness begin!
5. To keep the effect going, just add another tablet piece. For a true lava lamp effect, shine a flashlight through the bottom of the bottle.
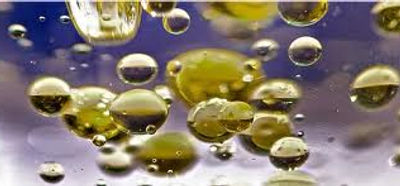
To begin, the oil stays above the water because the oil is lighter than the water or, more specifically, less dense than water. The oil and water do not mix because of something called "intermolecular polarity." That term is fun to bring up in dinner conversation. Molecular polarity basically means that water molecules are attracted to other water molecules. They get along fine, and can loosely bond together (drops.) This is similar to magnets that are attracted to each other. Oil molecules are attracted to other oil molecules, they get along fine as well. But the structures of the two molecules do not allow them to bond together. Of course, there’s a lot more fancy scientific language to describe density and molecular polarity, but maybe now you’ll at least look at that vinegrette salad dessing in a whole new way.
When you added the tablet piece, it sank to the bottom and started dissolving and creating a gas. As the gas bubbles rose, they took some of the colored water with them. When the blob of water reached the top, the gas escaped and down went the water. Cool, huh? By the way, you can store your "Blobs In A Bottle" with the cap on, and then anytime you want to bring it back to life, just add another tablet piece.


-
one cup of milk
-
4 teaspoons of white vinegar
-
A bowl
-
A strainer
-
Adult help
-
Ask your friendly adult to heat up the milk until it is hot, but not boiling
-
Now ask the adult to carefully pour the milk into the bowl
-
Add the vinegar to the milk and stir it up with a spoon for about a minute
-
Now the fun part, pour the milk through the strainer into the sink - careful it may be hot!
-
Left behind in the strainer is a mass of lumpy blobs.
-
When it is cool enough, you can rinse the blobs off in water while you press them together .
-
Now just mold it into a shape and it will harden in a few days. - Cool!
Plastic? In milk? Well, sort of. You made a substance called CASEIN. It's from the latin word meaning "cheese." CasEin occurs when the protien in the milk meets the acid in the vinegar. The casein in milk does not mix with the acid and so it forms blobs. True plastics, called poymers, are a little different. If you want to make a true plastic and learn more about polymers.

-
A wooden skewer or chop stick
-
A clothespin
-
1 cup of water
-
2-3 cups of sugar
-
A tall narrow glass or jar
-
Clip the wooden skewer into the clothespin so that it hangs down inside the glass and is about 1 inch (2.5 cm) from the bottom of the glass. (as shown)
-
Remove the skewer and clothespin and put them aside for now.
-
Get a helpful adult!
-
Pour the water into a pan and bring it to boil.
-
Pour about 1/4 cup of sugar into the boiling water, stirring until it dissolves.
-
Keep adding more and more sugar, each time stirring it until it dissolves, until no more will dissolve. This will take time and patience and it will take longer for the sugar to dissolve each time.Be sure you don't give up too soon. Once no more sugar will dissolve, remove it from heat and allow it to cool for at least 20 minutes.
NOTE: While it is cooling, some peole like to dip half of the skewer in the sugar solution and then roll it in some sugar to help jump start the crystal growth. If you do this, be sure to let the skewer cool completely so that sugar crystals do not fall off when you place it back in the glass.
Have your friendly ADULT carefully pour the sugar solution into the jar almost to the top. Then submerge the skewer back into the glass making sure that it is hanging straight down the middle without touching the sides.
Allow the jar to fully cool and put it someplace where it will not be disturbed.
Now just wait. The sugar crystals will grow over the next 3-7 days.
Want colored rock candy? Add food coloring to your sugar water and make sure sure that it is pretty dark in color for the best result.
When you mixed the water and sugar you made a SUPER SATURATED SOLUTION. This means that the water could only hold the sugar if both were very hot. As the water cools the sugar "comes out" of the solution back into sugar crystals on your skewer. The skewer (and sometines the glass itself) act as a "seed" that the sugar crystals start to grow on. With some luck and patience you will have a tasty scientific treat! Enjoy!

Sometimes it’s hard to tell SCIENCE from MAGIC - and this little demonstration is a great example of that. In this experiment you will watch an almost clear liquid suddenly turn dark blue in a flash. It takes a bit of preparation, and probably a trip to the pharmacy for materials, but we think it’s worth it.
IMPORTANT SAFETY INFORMATION: This experiment should only be done with the help of an adult. Iodine will stain just about anything it touches and it can be hazardous. Hydrogen peroxide can cause eye and skin irritation - safety goggles are needed throughout the experiment. Be sure your helpful adult reads the caution labels on each container.
-
3 clear plastic cups 4 ounces or larger
-
A 1000 mg Vitamin C tablet from the pharmacy (you can also use two 500mg)
-
Tincture of iodine (2%) also from the pharmacy
-
Hydrogen peroxide (3%) yep, also from the pharmacy
-
Liquid laundry starch (see below for alternatives)
-
Safety goggles
-
Measuring spoons
-
Measuring cup
-
An adult helper
-
Put on those safety goggles and mash the 1000 mg Vitamin C tablet by placing it into a plastic bag and crushing it with a rolling pin or the back of a large spoon. Get it into as much of a fine powder as possible. Then put all the powder in the first cup and add 2 ounces (60 ml) of warm water. Stir for at least 30 seconds. (The water may be a little cloudy) Let’s call this “LIQUID A”
-
Now put 1 teaspoon (5 ml) of your LIQUID A into a new cup and add to it: 2 oz (60 ml) of warm water and 1 teaspoon (5 ml) of the iodine. Notice the brown iodine turned clear! Let’s call this “LIQUID B.” By the way, you’re done with LIQUID A - you can put it aside.
-
In the last cup, mix 2 oz of warm water, 1 Tablespoon (15 ml) of the hydrogen peroxide and 1/2 teaspoon (2.5 ml) of the liquid starch. This is, you guessed it, “LIQUID C”
-
Okay, that was a lot of preparation, on to the fun part. Gather the friends and family and pour all of LIQUID B into LIQUID C. Then pour them back and fourth between the 2 cups a few times. Place the cup down and observe….be patient....somewhere between a few seconds and a few minutes, the liquid will suddenly turn dark blue!
This is an example of the chemical reaction know as the IODINECLOCK REACTION. It is called a clock reaction because you can change the amount if time it takes for the liquids to turn blue. (see experiments below) The chemistry of the demonstration gets a bit complicated, but basically it is a battle of chemistry between the starch which is trying to turn the iodine blue, and the Vitamin C which is keeping it from turning blue. Eventually the Vitamin C loses and, bam! - you get instant blueness.
Note: If you do not have liquid starch, you can also use 1/2 teaspoon of corn starch or potato starch. The liquids will be more cloudy and the reaction will happen a bit more slowly, but it’s still impressive.
Clean up: Carefully pour all liquids down the drain with plenty of water and wash your hands. Recycle the cups or dispose of them in the trash.


|
What you'll need:
Instructions:
What's happening? While water often mixes with other liquids to form solutions, oil and water does not. Water molecules are strongly attracted to each other, this is the same for oil, because they are more attracted to their own molecules they just don't mix together. They separate and the oil floats above the water because it has a lower density. If you really think oil and water belong together then try adding some dish washing liquid or detergent. Detergent is attracted to both water and oil helping them all join together and form something called an emulsion. This is extra handy when washing those greasy dishes, the detergent takes the oil and grime off the plates and into the water, yay! |

